II.Editing for Beginners
Part 2 - Cut, Copy and Paste - Part 2
The most basic editing step is cut and paste. It's what people did with tape and it's easy with data in computers, so take a look at these basic operations, referred to as Cut, Copy and Paste.
The next page will handle Silence, Duplicate and Split.
You may also want to check out the screen section, so you'll know where to find all the tools and how to resize tracks for example.
It is assumed that you have a project open and that at least one track of audio material is present.
Let's take a look at this example of an Audacity window:
The Audacity Window
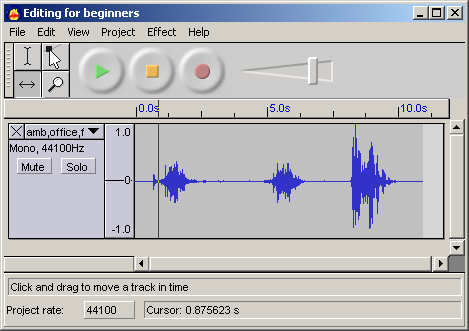
As you can see by the graphics above, the
time shift tool  is selected. It is used to move the entire audio clip around inside its track.
The cursor (little blinking line across a track and the timeline) will remain at its position, so effectivly you'll be sliding your audio material underneath the cursor.
Let's say we want to cut out that bit in the middle then. First we've got to select it.
Making a selection
To select the part you wish to cut, copy or paste to, use the selection tool  . If it's not activated, do so now by clicking on it in the toolbar.
Now press and hold the left mouse button while you drag the mouse to mark an area.
This area is darker than the surrounding area of the clip. Note, that even though you can mark an area larger than or extending beyond the actual audio clip in the track, the operations will only work on the actual clip. Playback however will work outside the clip.
Press the space bar to listen to the audio in the marked area.
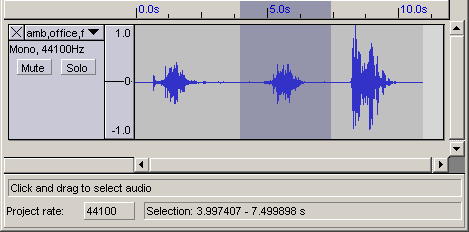
To extend or contract your selection, hold down the SHIFT button and click on the area you wish your selection to extend or contract to.
If you click at a spot that is on the right hand side from the middle of the current selection, you will set the right hand boundary of your new selection.
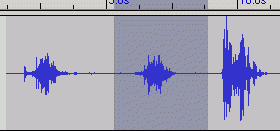
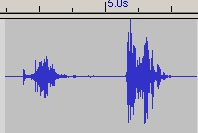
Cutting the selection
|
Cut the selection by selecting "Cut" from the Edit menu ...

|
or press CTRL+X.
|
Here's what you'll see :
| Before the cut |
After the cut |
 |
 |
To undo this operation, select Undo in the Edit menu or press CTRL+Z
Copy will copy the selection to the clipboard.
You can then paste that data back in to any track by clicking where you want this audio to be inserted and select Paste in the Edit menu,
or press CTRL+V.
Thus pasting is the opposite of cutting. You can also copy material, make another selection with the mouse and then paste. This will replace the selected material with the contents of the clipboard, no matter how short or long either of them are.
During all operations of this kind, the bottom row of the screen will display two things, namely the start time and the end time of your selection. The display to the left if that called "Project rate:" and its value, defaulting to 44100, can be changed by clicking on that number and selecting another from the drop-down menu.
All files, no matter which will be played at that rate. Should the sample rate of a track be different from the Project Rate, these tracks will stutter at track sample rates set lower than the Project Rate. Audacity will warn you , if an audio file is of a sample rate different from the current Project Rate. Audacity will not change the sample rate of any imported audio though.
proceed to Part 3 - Silence, Duplicate and Split.
Back to the main page