30. Communications
You will almost certainly want to go "online," or otherwise
communicate with other systems. Most systems today are sold with the
necessary hardware that you need in order to be able to connect to other
systems, such as a modem or a network card. You connect this hardware to
the outside world via a telephone line or network connection.
This chapter includes recipes for connecting your Linux system to the
Internet with an ISP, using fax services, and making serial connections
with a modem.
For more information on this subject, see
The Linux
Network Administrator's Guide.
30.1 Connecting to the Internet
@sf{Debian}: `ppp'
@sf{WWW}: ftp://cs.anu.edu.au/pub/software/ppp/
There are several ways to connect a Linux box to the Internet. Digital
Subscriber Line (DSL) service, cable modems, and dial-up connections
with ISDN or analog modems are currently the most popular methods. Each
of these services have their own hardware and software requirements.
For up-to-date, detailed instructions for using these services on
Linux-based systems, the relevant HOWTOs published by the
Linux Documentation Project remain the
definitive guides (see section Reading System Documentation and Help Files):
-
ISP Hookup HOWTO, by Egil Kvaleberg
http://www.linuxdoc.org/HOWTO/ISP-Hookup/
-
DSL HOWTO for Linux, by David Fannin
http://www.linuxdoc.org/HOWTO/DSL-HOWTO/
-
Cable Modem Providers HOWTO, by Vladimir Vuksan
http://www.linuxdoc.org/HOWTO/Cable-Modem/
The following recipes show how to set up and use a PPP ("Point-to-Point
Protocol") dial-up connection, long the de facto means of
connecting a computer to the Internet over a dial-up line.
30.1.1 Setting Up PPP
To configure PPP for a regular dial-up connection, where your system is
assigned a dynamic IP address (the norm for home Internet access), you
need to be root (the superuser) to edit the PPP configuration
files, and you'll need the standard connection information from your
ISP: the dial-up number to use, the IP addresses for their nameservers,
and your username and password for accessing their system.
Use this information to customize the file
`/etc/chatscripts/provider':
| | ABORT BUSY
ABORT "NO CARRIER"
ABORT VOICE
ABORT "NO DIALTONE"
"" "\p\p+++\p\p"
"" "at"
"" "at"
OK "ath0"
"" atdt5551010,,
ost ppp
ogin smith
word \qsecret\q
|
In this example, after eight lines of modem initialization strings, the
modem is instructed to dial the ISP dial-up number, `5551010'. Some
systems need one or two commas after the number to signify pauses for
the modem; only do this if you can't get a good connection with just the
telephone number in this space.
Next is the "host" line: this is an optional line used by some ISPs
whose connection line contains a choice of services from which you must
make a selection before entering your username and password (some ISPs
offer SLIP and shell access along with the standard PPP, for example);
customize this and the following lines as instructed by your ISP.
Finally, the username `smith' is given, and then the password of
`secret'. The password appears between two `\q' strings,
which--for security purposes--instruct ppp to display the
question mark (`?') characters instead of the actual password in
system log files or other places where an intruder might see it.
Next, edit the file `/etc/ppp/peers/provider' so that it contains
these lines:
| | connect "/usr/sbin/chat -v -f /etc/chatscripts/provider"
defaultroute /dev/modem 115200 persist
|
The last line in this file should include the device name of the modem
you are using and the maximum connect speed to try; the preceding
example uses `/dev/modem' as the device name of the modem, and
115,200 bps as the maximum connect speed, which is a good value for a
typical 56K modem (a rule of thumb is to use the highest connect speed
your modem supports; you can always go lower when a connection is made,
but you can never raise the speed above what is given here).
Finally, edit the file `/etc/resolv.conf' so that it contains the
following, using the two nameserver IP addresses given to you by your
ISP:
| | search .
nameserver nameserver address 1
nameserver nameserver address 2
|
For the two nameserver address values, use the IP address of the
nameserver machines, as given to you by your ISP. The second is
optional--most ISPs have more than one designated nameserver as a
backup in the event that the first system becomes unavailable.
Make sure that your user account has membership to the dialout
group; otherwise, you'll have to have the superuser account start and
stop PPP, which is not recommended (see section Letting Users Access Hardware Peripherals).
Once you've done these things, you should be able to start and stop PPP
connections to the Internet. Complete documentation for setting up PPP
is in the `/usr/share/doc/ppp' directory.
30.1.2 Controlling a PPP Connection
After PPP has been installed and configured, use the pon tool to
start a PPP connection to the Internet. It calls the number of your ISP
with your modem, sends the appropriate login information, and starts the
PPP connection.
-
To start a PPP connection, type:
Once you have a PPP connection, you can connect to other systems on the
Internet via the WWW or other network services, as described in the
following chapters.
To make PPP automatically start when the system first boots, rename the
file `/etc/ppp/no_ppp_on_boot' to `/etc/ppp/ppp_on_boot'.
(you must be root, the superuser, to do this.)
To output the last few lines of the PPP log file, type plog. This
is useful for checking the progress of your PPP connection when it first
dials.
Use the poff tool to stop a PPP session. It disconnects your
computer from your ISP and hangs up the modem.
-
To stop a PPP session, type:
30.2 Faxing
@sf{Debian}: `efax'
@sf{WWW}: http://casas.ee.ubc.ca/efax/
If you have a Class 1 or 2 fax modem, you can send and receive fax
("facsimile") messages with your Linux system. The following
subsections show how to do this with the
efax package, which is
designed for single user systems or relatively simple fax configurations
(more complicated tools for faxing exist, but they are beyond the scope
of this book).
To set up efax for faxing, edit the file `/etc/efax.rc' (you
must be root to do this). The important things to specify in this
file are the value for `DEV', which is the device name in
`/dev' of the fax or modem device (this should almost always be
`modem'), and the values for `FROM' and `NAME'---the fax
number and organization name to appear on outgoing faxes.
NOTE: Unless you have membership to the dialout group,
you must ask your system administrator for access to the modem hardware
before you can use it (see section Letting Users Access Hardware Peripherals).
More information on faxing is contained in the Fax Server
mini-HOWTO (see section Reading System Documentation and Help Files).
30.2.1 Sending a Fax
Use efax to send a fax. It dials the telephone number you give
and faxes the contents of the file or files you specify. You can send
plain text files or files in TIFF Group 3 format as they are. You can
also send files in other formats, but you must convert them to
`tiffg3' first--see Converting to and from Fax Format.
Use the `-d' option to specify the full path name of the fax device
(usually `/dev/modem' if you are using the modem connected to your
system) and the `-t' option followed by a telephone number to
specify the number you are to send the fax to. To specify DTMF tone
dialing, precede the phone number with a `T'; specify pauses in the
dialing sequence with a comma (`,') character--this is useful for
dialing out from a PBX or office phone system.
-
To fax a copy of the file `resume.txt' to the number
`555-9099', using DTMF tone dialing, type:
| | $ efax -d /dev/modem -t T555-9099 resume.txt RET
|
To send more than one file, specify them as arguments in the order they
are to be sent. You can also specify them with a wildcard character, but
be careful--they are sent in the order in which the shell expands the
file names, which is alphabetical order. If you have a lot of files that
should be sent in a particular order, rename them so their file names
begin with the number of the page they correspond to. But be sure to
number them with the same number of digits for each file--for
example, if you have eleven files to fax, don't name them `1.fax',
`2.fax', and so on, to `10.fax' and `11.fax', because the
shell will expand them in the order of `1.fax', `10.fax',
`11.fax', `2.fax', `3.fax', and so on up to
`9.fax'. In this case, you would number them as `01.fax',
`02.fax', and so on, so that files one through nine contain the
same number of digits in their name as do `10.fax' and
`11.fax'.
-
To fax all of the files with the `.fax' extension in the current
directory to the number `555-9099', using DTMF tone dialing, type:
| | $ efax -d /dev/modem -t T555-9099 *.fax RET
|
Another way to do this is to make a text file containing the list of
files to fax, one file name per line, in the order you want them
sent. If the files you want to send are not in the current directory, be
sure to write the file names with path names relative to the current
directory--so for example, if you want to send the file
`header.fax', which is in your home directory, and the current
directory is `~/documents/faxes', the file should be specified as
`~/header.fax'.
-
To fax all of the files listed in the file `fax.list' to the number
`555-9099', dialing `9' first to obtain an outside line, and
using DTMF tone dialing, type:
| | $ efax -d /dev/modem -t T9,555-9099 $(cat fax.list) RET
|
NOTE: efax doesn't delete the files it faxes.
30.2.2 Receiving a Fax
To receive a fax, use efax with the `-w' option. You may
also have to use `-iSO=1' to send an `S0=1' command to the
modem to set it to auto answer, and use `-kZ' to send an `ATZ'
reset request to the modem after efax exits.
As with sending a fax, specify the full path name of the device file to
use with the `-d' option.
By default, efax outputs a "session log" to the standard error,
containing information on the status of the fax messages received; use
redirection to redirect it to a file (see section Redirecting Error Messages to a File).
-
To set up
efax to receive an incoming fax, saving the session log
to a file, `faxlog', type:
| | $ efax -d /dev/modem -kZ -w -iS0=1 2>&1 >> faxlog RET
|
This command starts efax and sets up the modem to wait for an
incoming fax. After a fax is received, efax exits. You can stop
efax before it receives a fax by typing C-c or by killing
the efax job (see section Stopping a Job).
When a fax is received, it is written to a file in the current directory
whose base name consists of the current numeric date and a session
number generated by efax; each page is written to a separate file
whose three-digit file extension is the page number. The received fax
files are in TIFF Group 3 fax format; use display to view them
(see section Viewing an Image in X), or convert them to
PostScript or another format for printing (see section Converting to and from Fax Format).
30.2.3 Receiving Faxes Automatically
@sf{WWW}: http://dsl.org/comp/tinyutils/
The command described in the previous recipe can only receive one fax;
once the fax is received,
efax exits. To set up your system so
that you automatically receive all incoming fax messages continually,
until you interrupt it, use
`faxon', part of the
tinyutils
package. It starts
efax for receiving an incoming fax, as
explained previously, but after a fax is received, it starts
efax
again and continues until you interrupt it.
-
To automatically receive any incoming fax messages, type:
| | $ faxon RET
efax: Wed Feb 24 08:38:52 1999 efax v 0.8a (Debian release 08a-6)
Copyright 1996 Ed Casas
efax: 38:52 opened /dev/modem
efax: 38:53 waiting for activity
|
Each time a fax is received and then saved, efax restarts,
waiting for another fax. A session log is written to the file
`faxlog' in your home directory.
Should an incoming facsimile message arrive, efax will receive it
and write the message in files in the current directory, with a file
name convention as described previously; then efax restarts,
ready to receive another fax. Type C-c to stop the script and exit
efax.
30.2.4 Converting to and from Fax Format
In order to view or print a received fax, or to fax a file that you
have, you must first convert the file to or from the TIFF Group 3
(`tiffg3') fax format, which is the standard format for sending fax
files. (You can, however, view `tiffg3' files with the GIMP, or
with display---see section Viewing an Image in X).
Use efix to convert (or "fix") files for faxing; it will
convert a file you want to fax to the `tiffg3' format. You
can also use it to convert received fax files to another format you can
view or print. efax outputs to standard output, but you can
redirect its output to a file to save it.
To convert a file for faxing, type efix followed by the name of
the file to convert, and redirect standard output to the file you want
to contain your fax image. efix can read plain text, PBM, and
TIFF files.
-
To convert the file `chart.pbm' for faxing, type:
| | $ efix -i pbm chart.pbm > chart.fax RET
|
This command converts a copy of the file `chart.pbm' to the
`tiffg3' fax format, writing it to a file called `chart.fax'.
The original PBM file is not altered.
To convert a PostScript file to fax format, use gs and specify
tiffg3 as the output device to write to--see Preparing a PostScript File for Printing.
-
To convert the PostScript file `resume.ps' to fax format, type:
| | $ gs -q -sDEVICE=tiffg3 -dSAFER -dNOPAUSE
-sOutputFile=resume.fax resume.ps < /dev/null RET
|
This command (typed all on one line) writes a copy of the file
`resume.ps' to the file `resume.fax' in `tiffg3' format,
which you can then send as a fax. The original PostScript file is not
altered.
To convert a received fax file to a PostScript file that you can then
preview (see section Previewing a PostScript File) or print
(see section Sending a Print Job to the Printer), use
the `-o ps' option.
-
To convert `19990325.001', a received fax file, to a PostScript
file, type:
| | $ efix -o ps 19990325.001 > received.ps RET
|
This command converts the fax file into a PostScript file called
`received.ps'.
30.3 Calling Out on a Modem
Use minicom to dial out with the modem and connect with another
system--such as when you want to connect to a BBS ("Bulletin Board
System"). It's a serial communications tool for X or the console; it
resembles some of the communications tools of the DOS world, such as
Telix and Procomm.
When you start minicom, the connection screen looks like this:
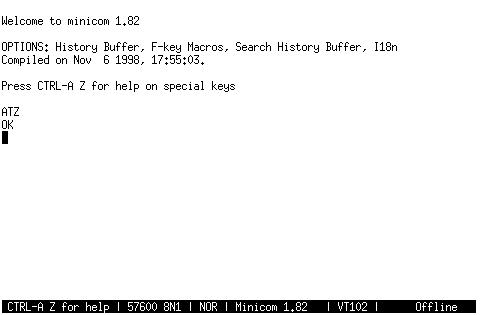
The bottom line contains a status bar showing a message describing how
to get help, the current modem settings (in this case, 57,600 bps, 8
data bits, no parity, one stop bit), whether or not cursor keys work
(the mysterious `NOR' message), the version of the program
(`1.82'), the kind of terminal emulation currently set
(`VT102'), and whether or not an online connection is currently
established.
To get a help menu, type C-a z; from this menu, you can press
P to set the communications parameters, T to set the
terminal settings, O to configure minicom, or D to
enter the dialing directory.
To dial a number from the main screen, type ATDT followed by the
number to dial.
-
To dial the number `368-2208', type:
When you type RET, minicom will begin dialing the number;
type any key to interrupt the dialing and hang up the line. Once
connected, type C-a h to hang up the line and type C-a x to
hang up the line and exit the program.
NOTE: minicom isn't really a way to connect your system
to the Internet; to do that, you normally start a PPP connection, as
described earlier in this chapter.(37)
This document was generated
using texi2html